Setting Up a Weapon
This guide walks you through the complete process of creating a weapon using the Weaponry Assembly System (WAS), from configuring Gameplay Tags to building the weapon, attaching it to a character and modifying it at runtime.
By the end of this tutorial you will have a fully functional modular weapon capable of changing both its appearance and gameplay properties depending on the selected modifications.
Requirements
Before creating your first weapon, make sure your Unreal Engine project is correctly configured.
- Weaponry Assembly System must be installed and enabled.
- The Gameplay Tags plugin must be enabled.
- The Niagara plugin must also be enabled. Unless it has been manually disabled, it is enabled by default in most Unreal Engine projects.
- For this tutorial I will be using this asset to create a modular M4. Feel free to use your own but make sure to follow the mesh rules
This tutorial assumes you are using the default implementation included with WAS. Once you understand the workflow, replacing the default weapon component with your own implementation is straightforward.

Preparing the Meshes
Before creating the weapon, it is important to prepare your meshes correctly. A proper mesh setup makes the assembly process much easier and ensures that every attachment aligns correctly regardless of the selected modification.
Spending a few minutes preparing your meshes will save a significant amount of time later. Most visual issues during assembly are caused by incorrectly configured meshes rather than the Weapon Asset itself.
Mesh preparation checklist
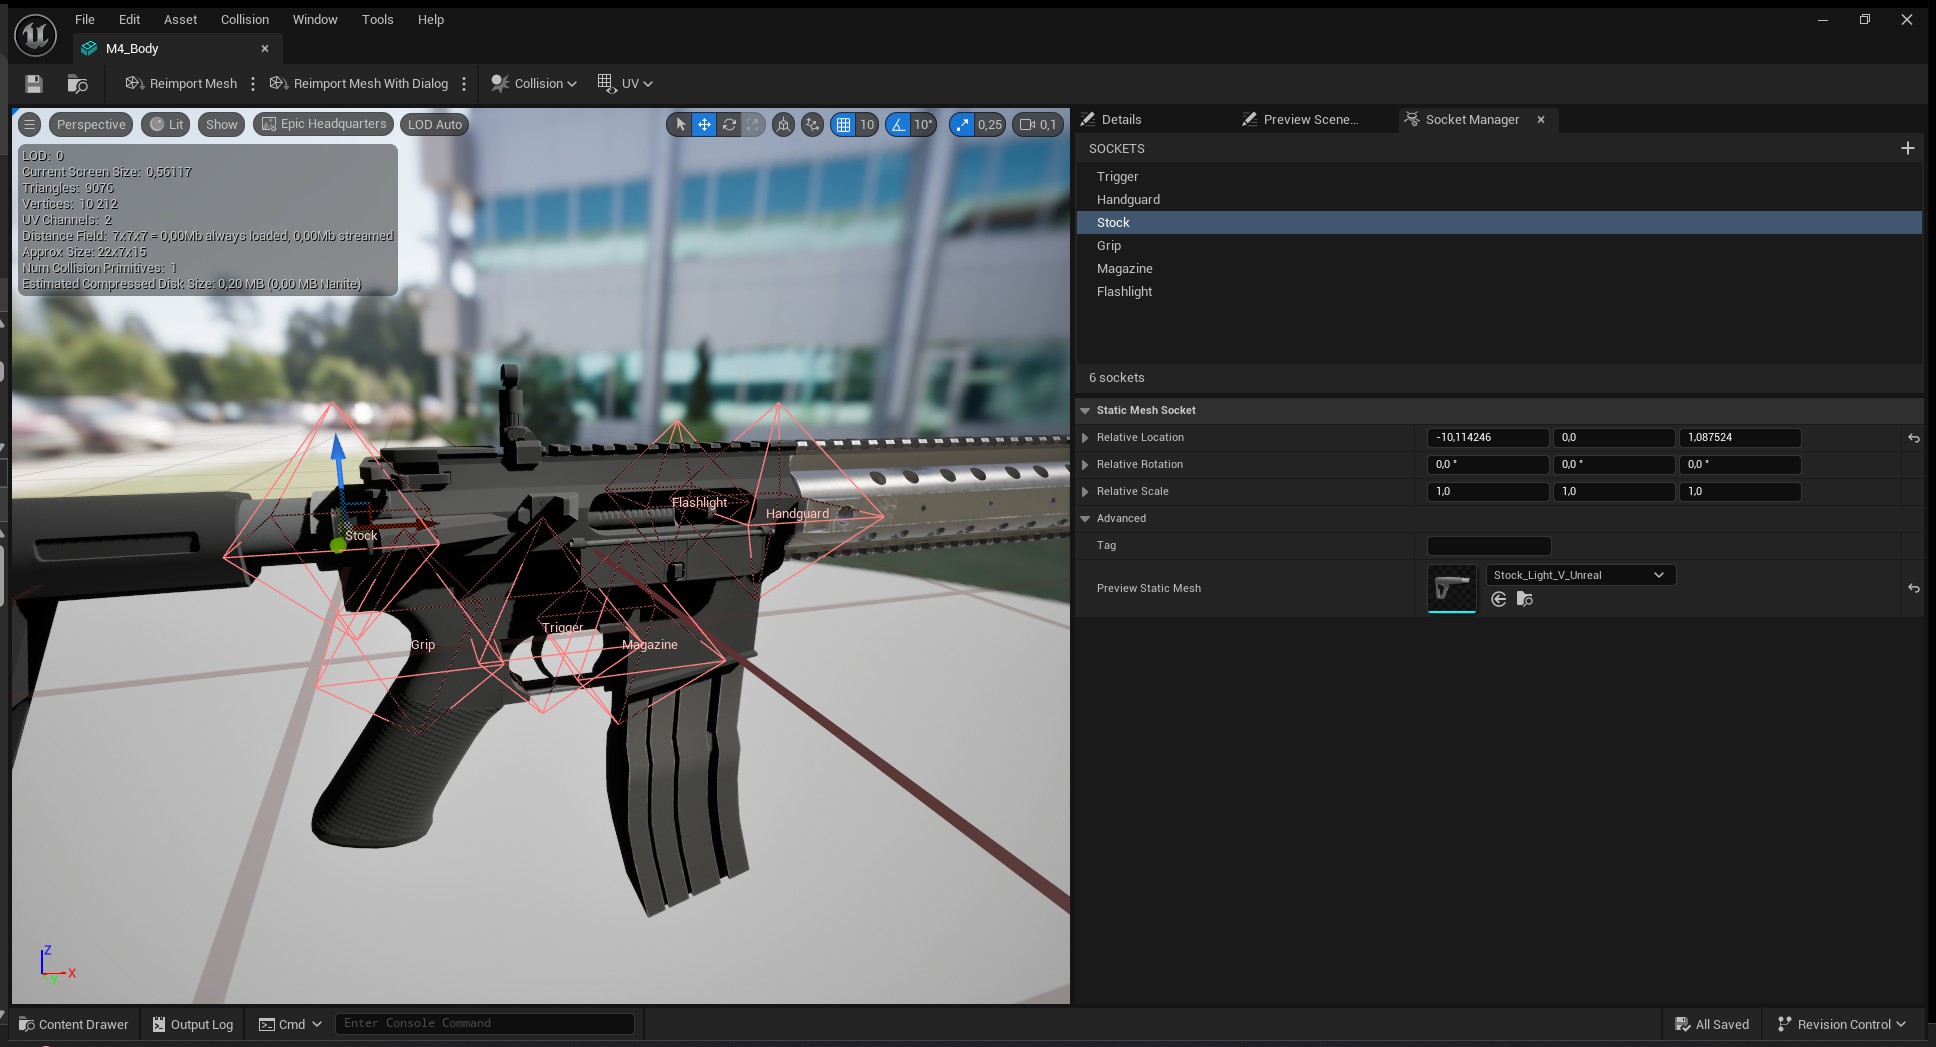
- Split every attachment into its own Static Mesh.
Each interchangeable part (barrel, stock, sight, magazine, grip, etc.) should be stored as an independentStatic Mesh. This allows WAS to swap individual parts without rebuilding the entire weapon. - Create sockets for every attachment point.
Any mesh capable of receiving attachments should expose one or more sockets. The socket name should match the logical attachment point you intend to use (for exampleSight,Barrel,MagazineorGrip). WAS will use these sockets when attaching child components. - Place the pivot at the attachment point.
Every interchangeable mesh should have its pivot positioned where it connects to its parent. This allows different modifications to share the same alignment without requiring individual offsets. - Verify socket transforms.
Use the Static Mesh Editor's Preview Asset feature to check that sockets are positioned and rotated correctly. Doing this before importing the meshes into the Weapon Asset will prevent most alignment problems.
- Using a single mesh containing the entire weapon.
- Pivots placed at the world origin instead of the connection point.
- Sockets with incorrect orientation or position.
- Different modifiers using inconsistent pivot locations.
Once every mesh is prepared correctly, creating the Weapon Asset becomes a straightforward process. The editor will only need to spawn the appropriate meshes and attach them through their sockets, allowing every weapon configuration to assemble automatically at runtime.
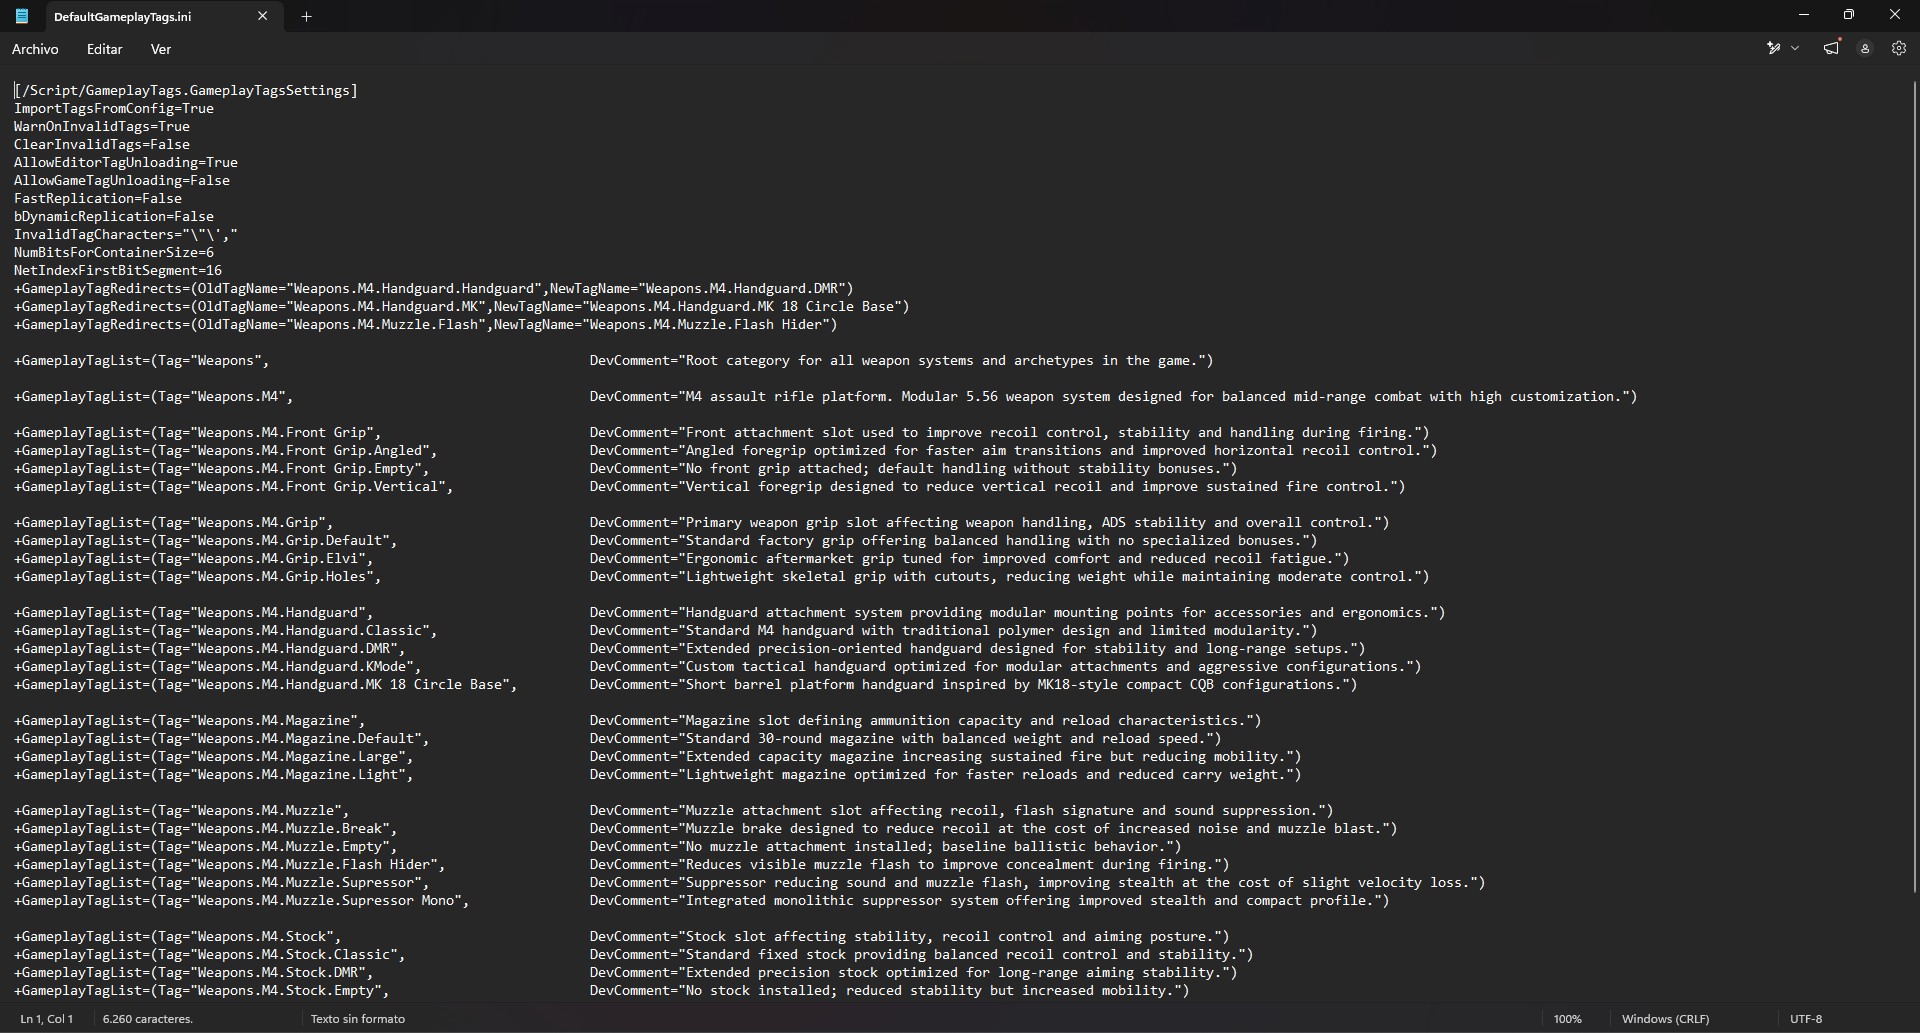
Create the Gameplay Tags
The entire Weaponry Assembly System is driven by Gameplay Tags. Instead of hardcoding every slot or attachment, the plugin reads your tag hierarchy and automatically generates the available modification points.
Although tags can be created from the Unreal Editor, editing
Config/DefaultGameplayTags.ini
is usually much faster when creating many weapons.
Define your Gameplay Tags before creating weapon assets. Changing the hierarchy later may require updating existing assets.
Expected hierarchy
- Weapon
-
Weapon.Slot0-
Weapon.Slot0.Modification0 -
Weapon.Slot0.Modification1 -
Weapon.Slot0.Modification2
-
-
Weapon.Slot1-
Weapon.Slot1.Modification0 -
Weapon.Slot1.Modification1 -
Weapon.Slot1.Modification2
-
-
Weapon.Slot2-
Weapon.Slot2.Modification0 -
Weapon.Slot2.Modification1 -
Weapon.Slot2.Modification2
-
-
The plugin only requires one rule:
- Every weapon root must contain its available slots.
- Every slot must contain every available modification.
For example:
Weapon
├── Slot0
│   ├── Modification0
│   ├── Modification1
│   └── Modification2
├── Slot1
└── Slot2
Populate the DevComment field for every Gameplay
Tag. Those descriptions can later be reused inside the in-game
weapon customization menu, reducing duplicated work.
Create Weapon Characteristics
Before creating the weapon itself, we first need a class that stores its configurable gameplay properties.
Think of UWeaponDefaultCharacteristics as a reusable
data container. It does not
represent the weapon actor or component. Instead, it exposes every
configurable property such as fire rate, recoil, magazine size,
spread, damage and any custom variables you decide to add.
Separating gameplay data from the weapon implementation allows multiple weapons to reuse the same logic while exposing completely different configurations.
Creating the Blueprint
-
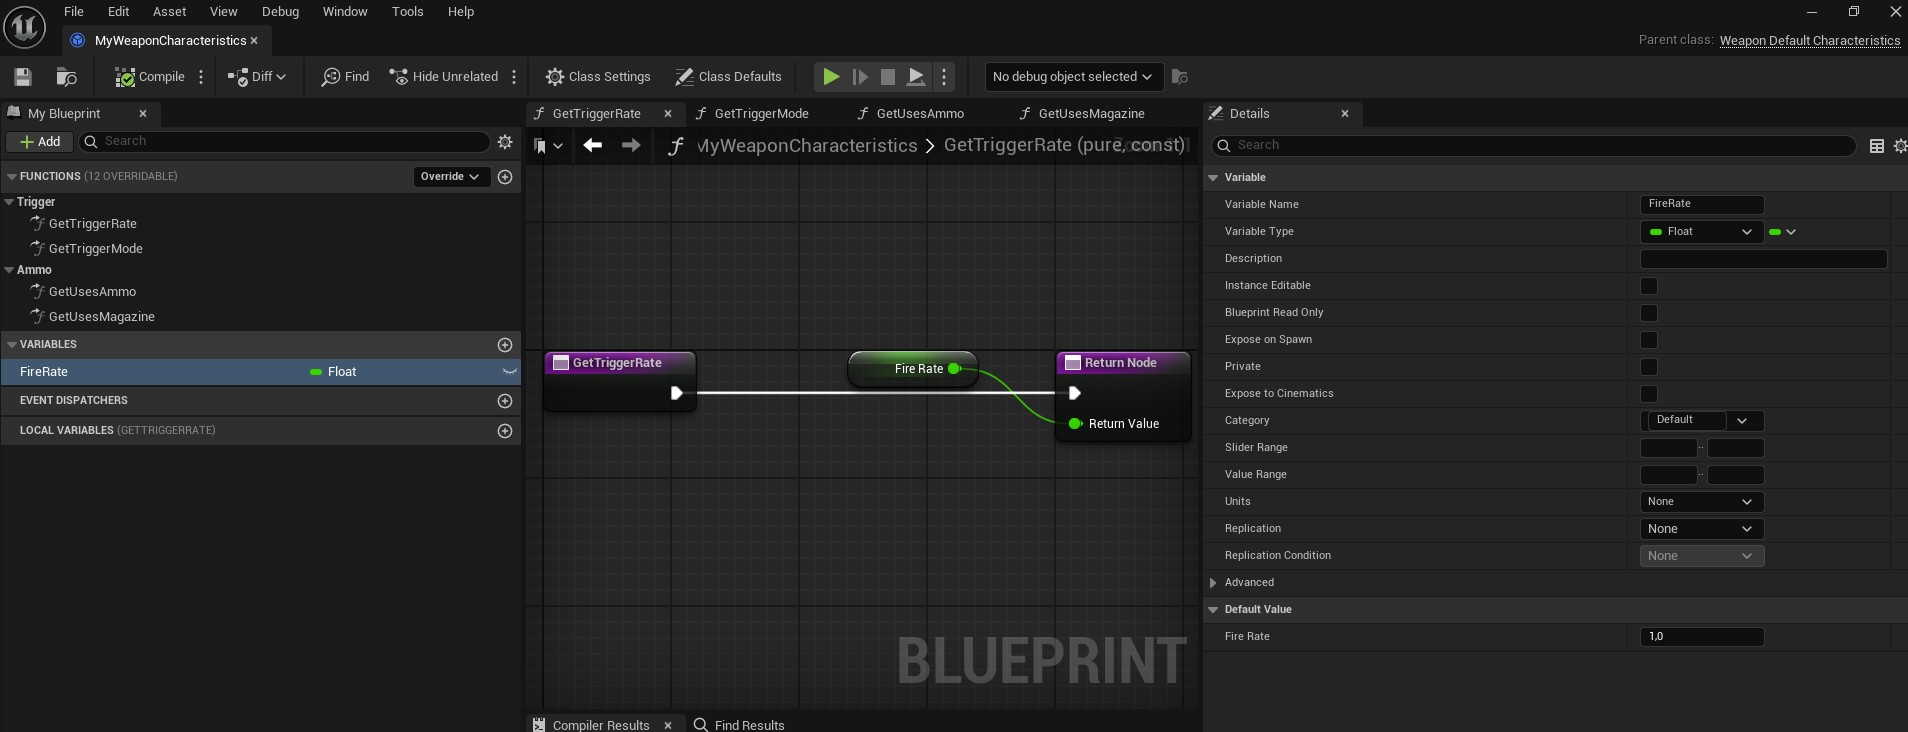
Create a new Blueprint derived from
UWeaponDefaultCharacteristics. -
Add a new
floatvariable called Fire Rate. -
Override
GetTriggerRate()and return the variable. -
Override
GetTriggerMode()and returnAutomatic. -
Override
GetUsesAmmo()andGetUsesMagazine()and temporarily returnfalsefor both.
During the first setup we want to verify that the weapon is working correctly. Disabling ammunition avoids introducing extra systems before the weapon itself has been validated.
Create the Weapon Asset
The Weapon Asset is the heart of the Weaponry Assembly
System. Unlike the
Weapon Characteristics, which only store
gameplay values, the Weapon Asset defines
how the weapon is built,
which components are spawned, and
how every modification affects both visuals and
gameplay.
Think of the Weapon Asset as a construction blueprint. Every time the weapon needs to be assembled or rebuilt, the graph is evaluated and all selected modifications are applied automatically.

Create the asset
- Right-click anywhere inside the Content Browser.
- Select Create Advanced Asset.
- Open the Weapon Asset category.
- Create a new
Weapon Asset. -
Give it a meaningful name, for example
WA_M4. - Open it.
The editor is divided into three main areas:
- Graph – defines how the weapon is assembled.
- Viewport – previews the generated weapon.
- Details Panel – exposes all editable settings.
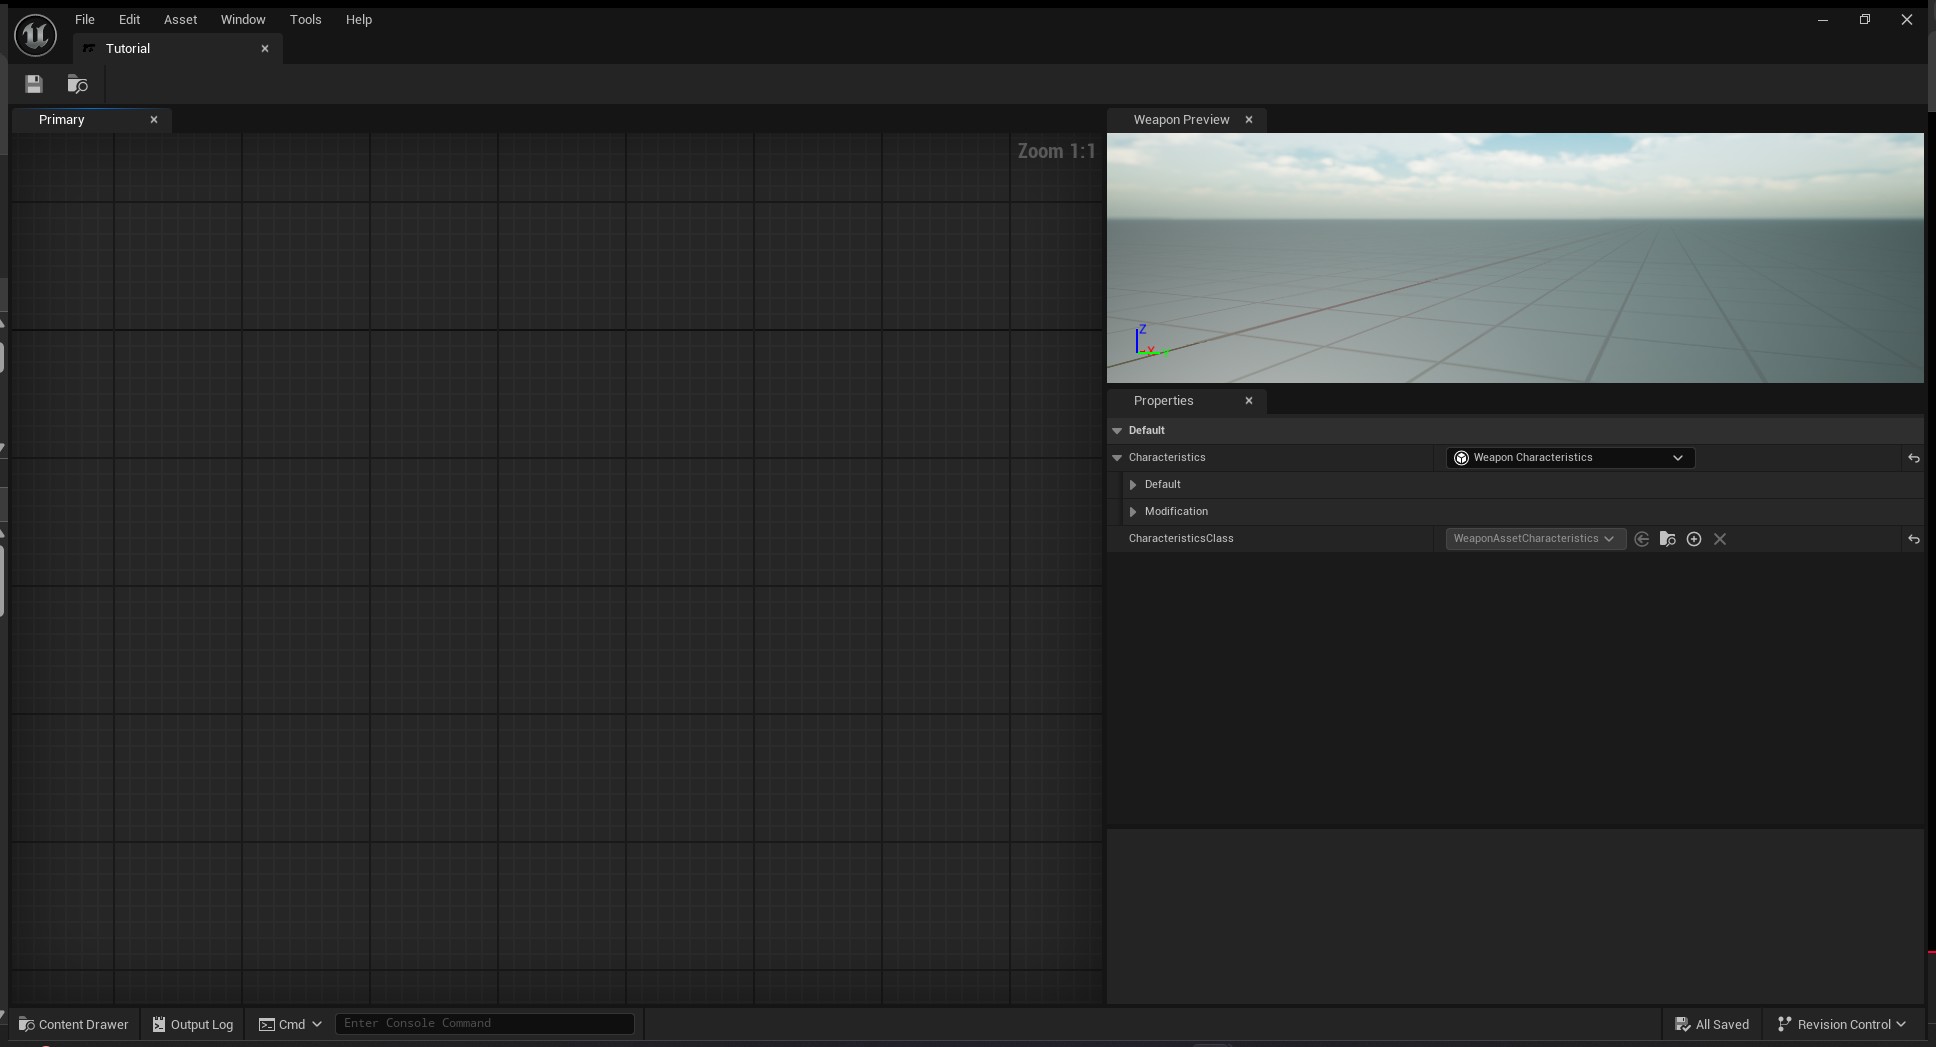
Assign the Characteristics
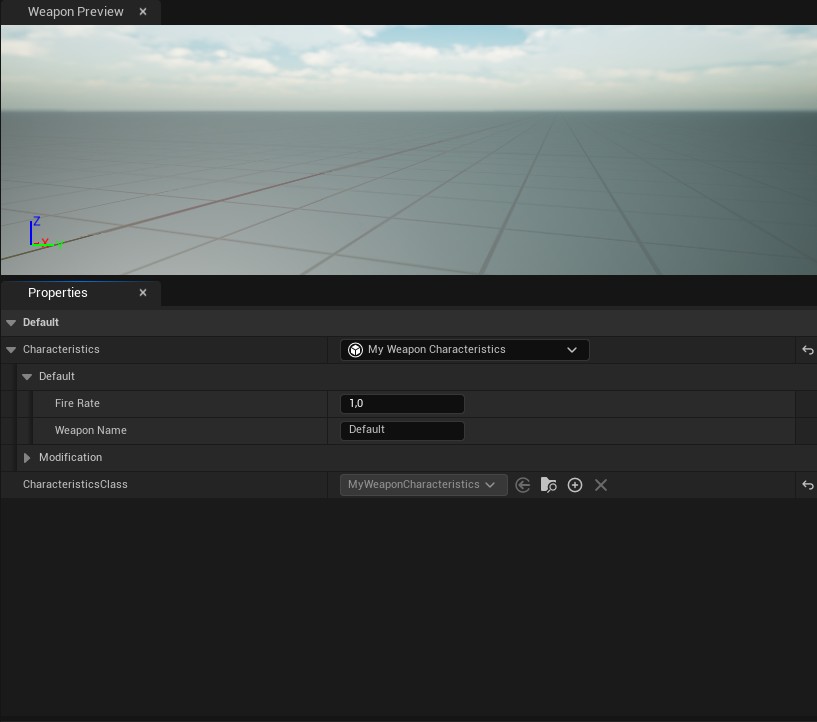
Before creating the graph, assign the characteristics blueprint created in the previous step.
- Open the Properties panel.
- Locate the
Characteristicsproperty. -
Assign your
UWeaponDefaultCharacteristicsBlueprint.
As soon as the asset knows which characteristics class it should use, all exposed gameplay properties become editable directly inside the asset.
This allows designers to tweak weapon values without modifying the Blueprint itself. The Blueprint defines what can be configured. The Weapon Asset defines which values are used.
Configure the Gameplay Tag hierarchy
Next, configure the Gameplay Tag root used by this weapon.
- Locate the
Weapon Rootproperty. - Select the Gameplay Tag representing this weapon.
For example:
WeaponThe plugin automatically searches every child slot and every modification belonging to that hierarchy.
If the slot list does not update immediately, simply save, close and reopen the asset. The editor caches part of the hierarchy to improve performance.
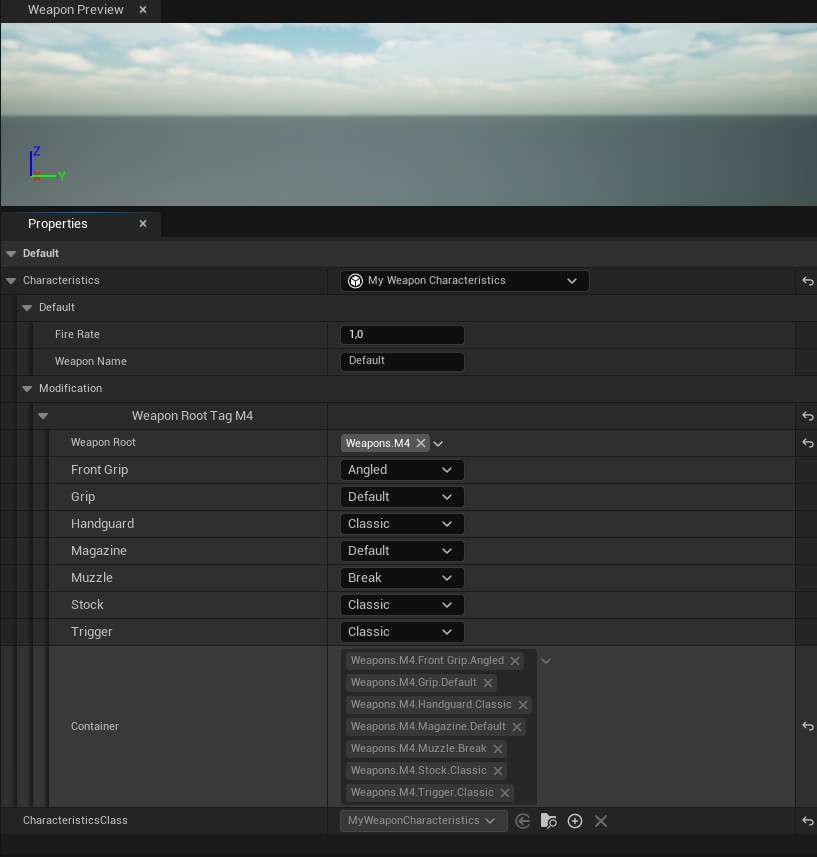
Once refreshed, every slot appears automatically inside the Modification section. Each slot contains every modification defined by its Gameplay Tags.
Build the base weapon
Now we can start defining how the weapon is assembled. The graph is executed from one or more entry nodes. Each entry node has a different purpose.
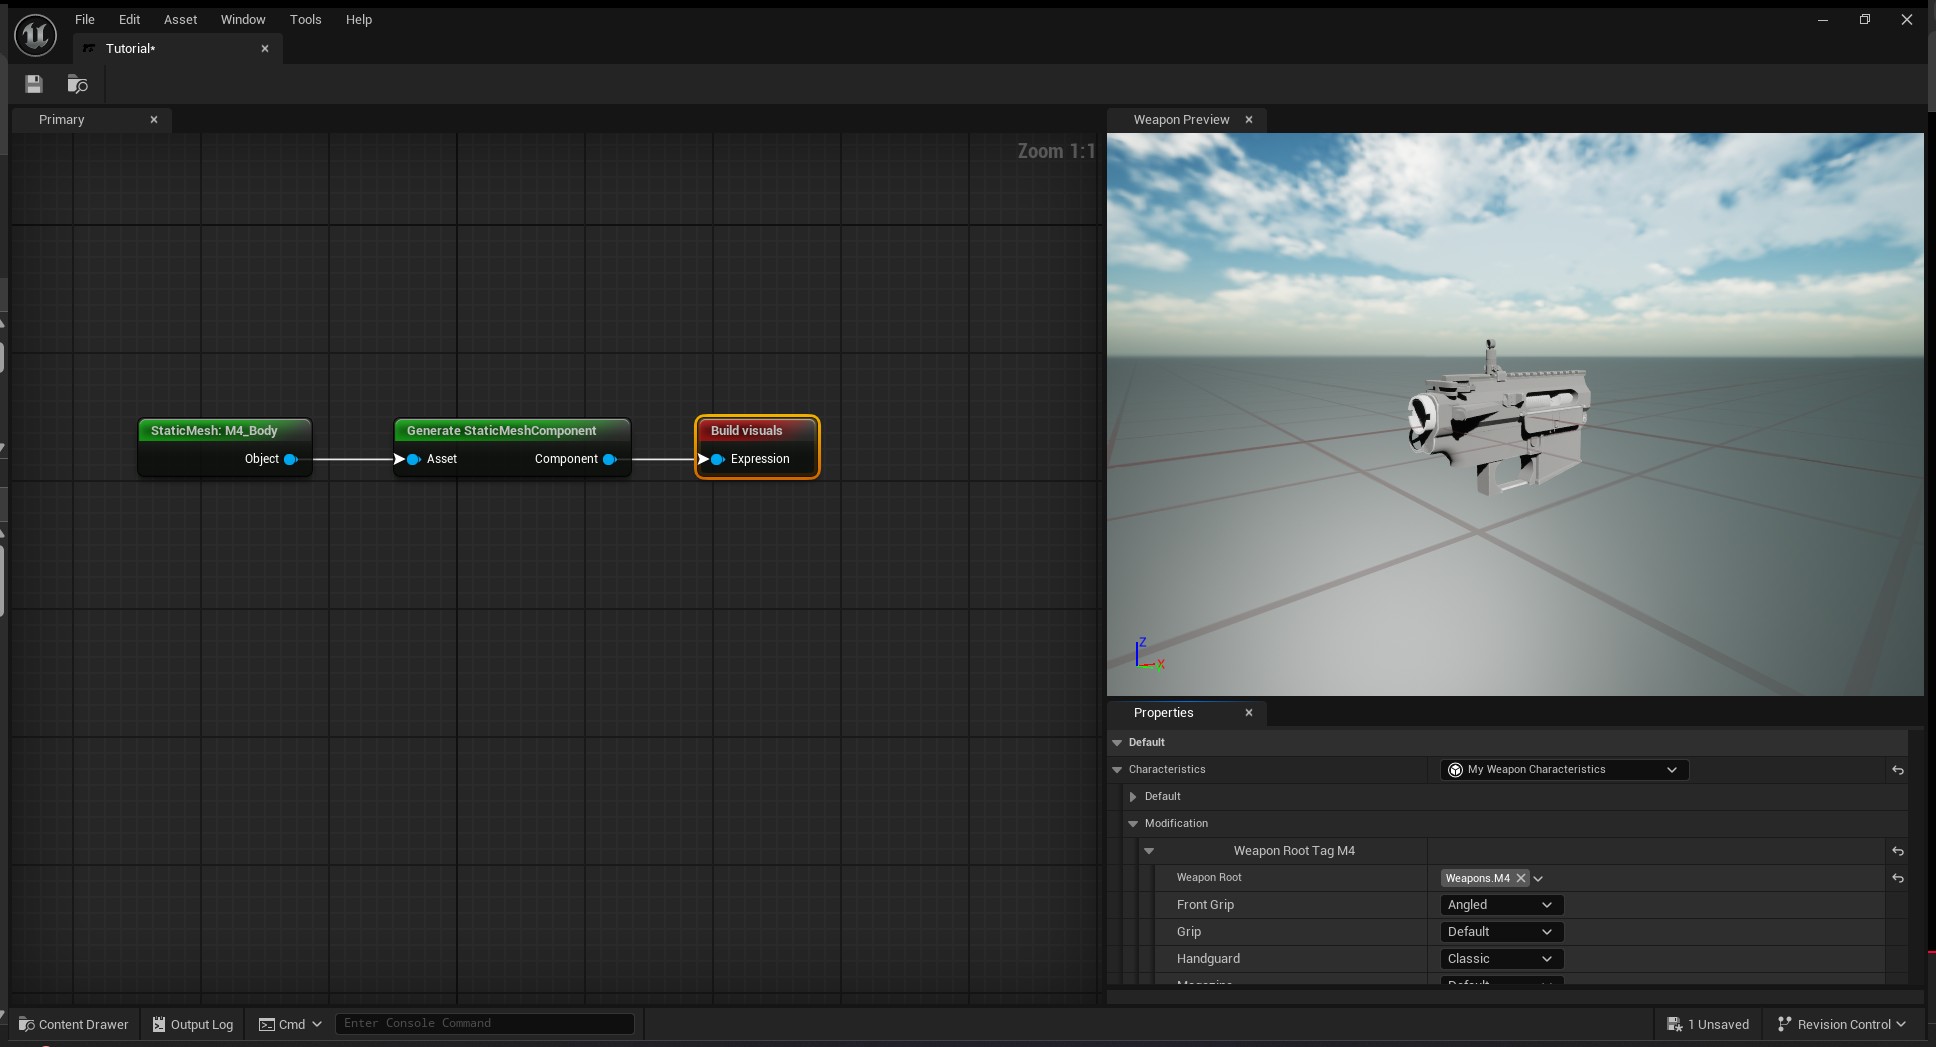
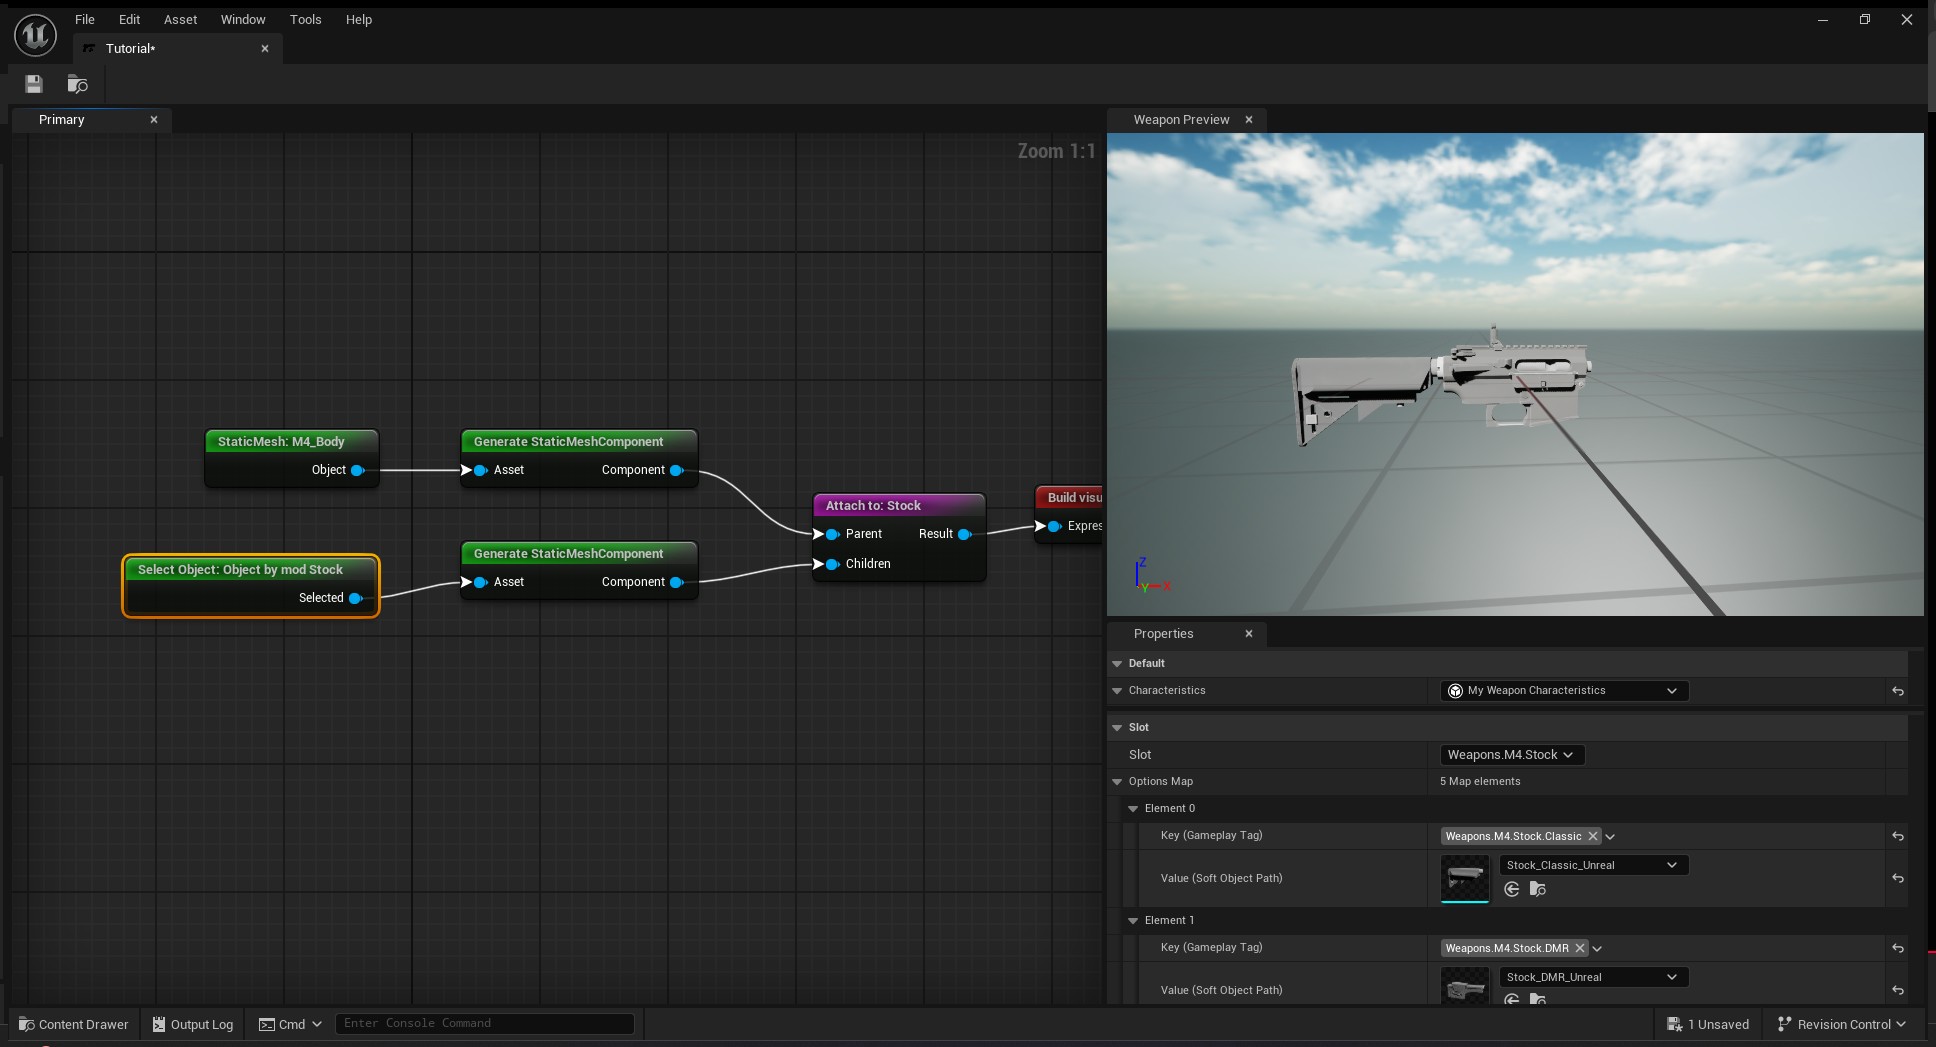
For building the visual representation, create a
Build Visuals node.
This entry point should only create or attach components. Avoid modifying gameplay properties here.
- Create a
Build Visualsnode. - Create a
Weapon Static Meshnode. - Create a
Literal Objectnode. - Connect the nodes together.
- Assign a Static Mesh inside the Details panel.
The Literal Object node is context-sensitive. Initially
it accepts any UObject, but once connected, it automatically filters
itself to the required asset type.
Adding modular attachments
Static meshes become truly modular when combined with
Select Object By Mod. Instead of spawning a
fixed mesh, the selected asset depends on the active weapon
modification.
- Create another
Weapon Static Mesh. -
Replace the
Literal ObjectwithSelect Object By Mod. - Choose the slot this selector controls.
- Assign one mesh for every available modification.
When the weapon is assembled, the correct mesh is selected automatically.
Adding a Tag node after spawning the component
is recommended. Tags make it much easier to identify components
later when adding animations, effects or custom gameplay logic.
To attach the generated component to another component, use
the Weapon Attachment node and specify the socket name. You can chain multiple
attachments together to build complex weapon hierarchies.
Modify gameplay properties
Visuals are only half of the weapon. Different modifications usually change gameplay values as well.
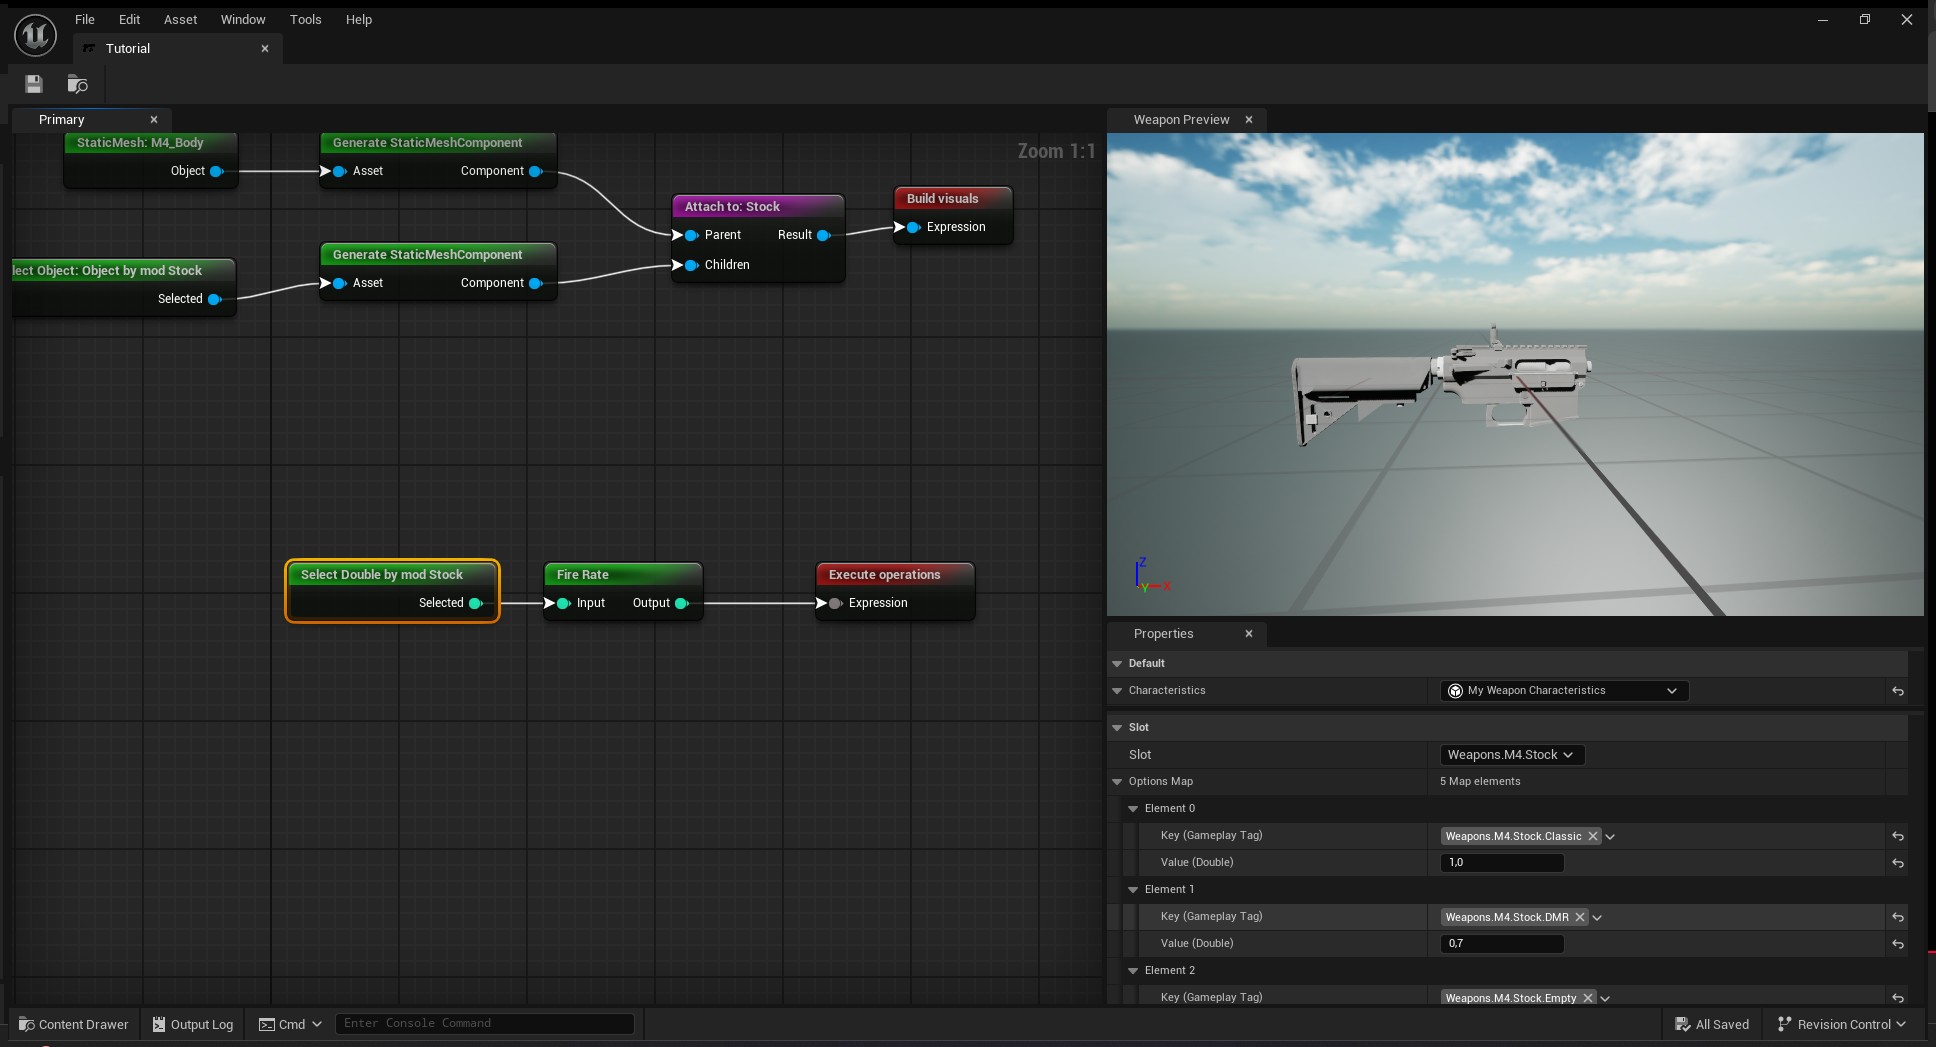
For that purpose, create an
Execute Operations entry node.
Unlike Build Visuals, this graph should
only modify gameplay properties. Keeping visuals and
gameplay separated makes graphs significantly easier to
maintain.
- Create an
Execute Operationsnode. - Create the
Fire Rateproperty node. - Connect a
Select Float By Mod. - Select the desired slot.
- Assign a different fire rate for every modification.
Whenever the weapon is rebuilt, the selected modification automatically updates both the weapon's appearance and its gameplay values.
Create the Weapon Component
So far we have defined what the weapon is and how it should be built. The next step is to give it a brain – a component that handles input, fires the weapon and communicates with the rest of the game.
The plugin provides a base class,
UWeaponComponent, that already contains all the
core logic for trigger handling, firing and rebuild events.
We only need to create a child Blueprint and override a few
functions to hook into those events.
Blueprint Setup
-
Create a new Blueprint class, parent
UWeaponComponent. Name it something like BP_SimpleWeapon. - Open the Blueprint and go to the Event Graph.
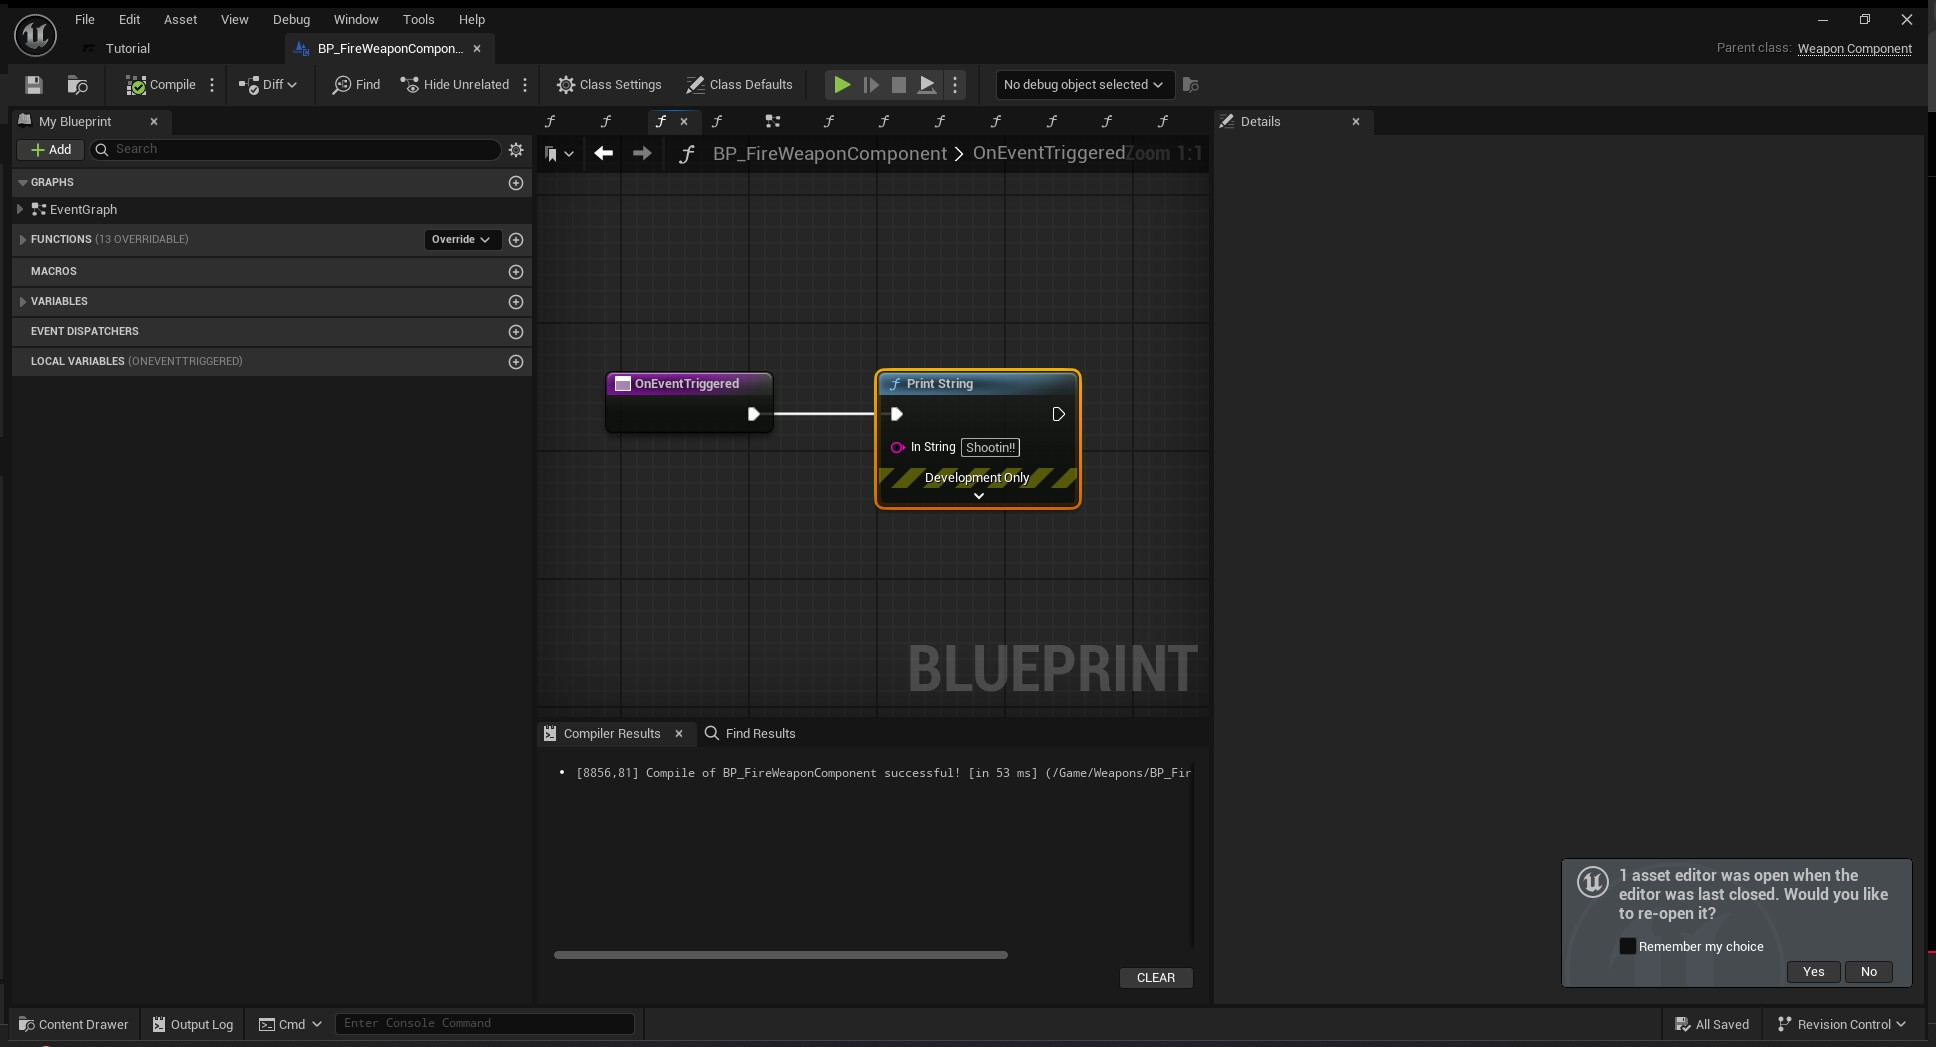
Override Trigger Events
Override OnEventTriggered and
OnEventTriggerFailed. These are called
automatically by the base component whenever the weapon
tries to fire.
OnEventTriggered
Called when the weapon successfully fires. For now, just print a message.
Print String "Shooting works!!!"OnEventTriggerFailed
Called when the weapon cannot fire.
Print String "Could not shoot :("The base component already handles continuous trigger pull (automatic fire), rate limiting and state management. You only need to override the events you care about.
Set up the Character
With the Weapon Component ready, we can attach it to a character and bind the shooting input.
Add the Weapon Component
-
Open your Character Blueprint (or create a new one based
on
ACharacter). -
In the Components panel, click
Add Component and search for your
BP_SimpleWeapon(or anyUWeaponComponentchild). -
Select the newly added component and, in the
Details panel, assign the
Weapon Asset you created earlier (
WA_M4).
Bind Input
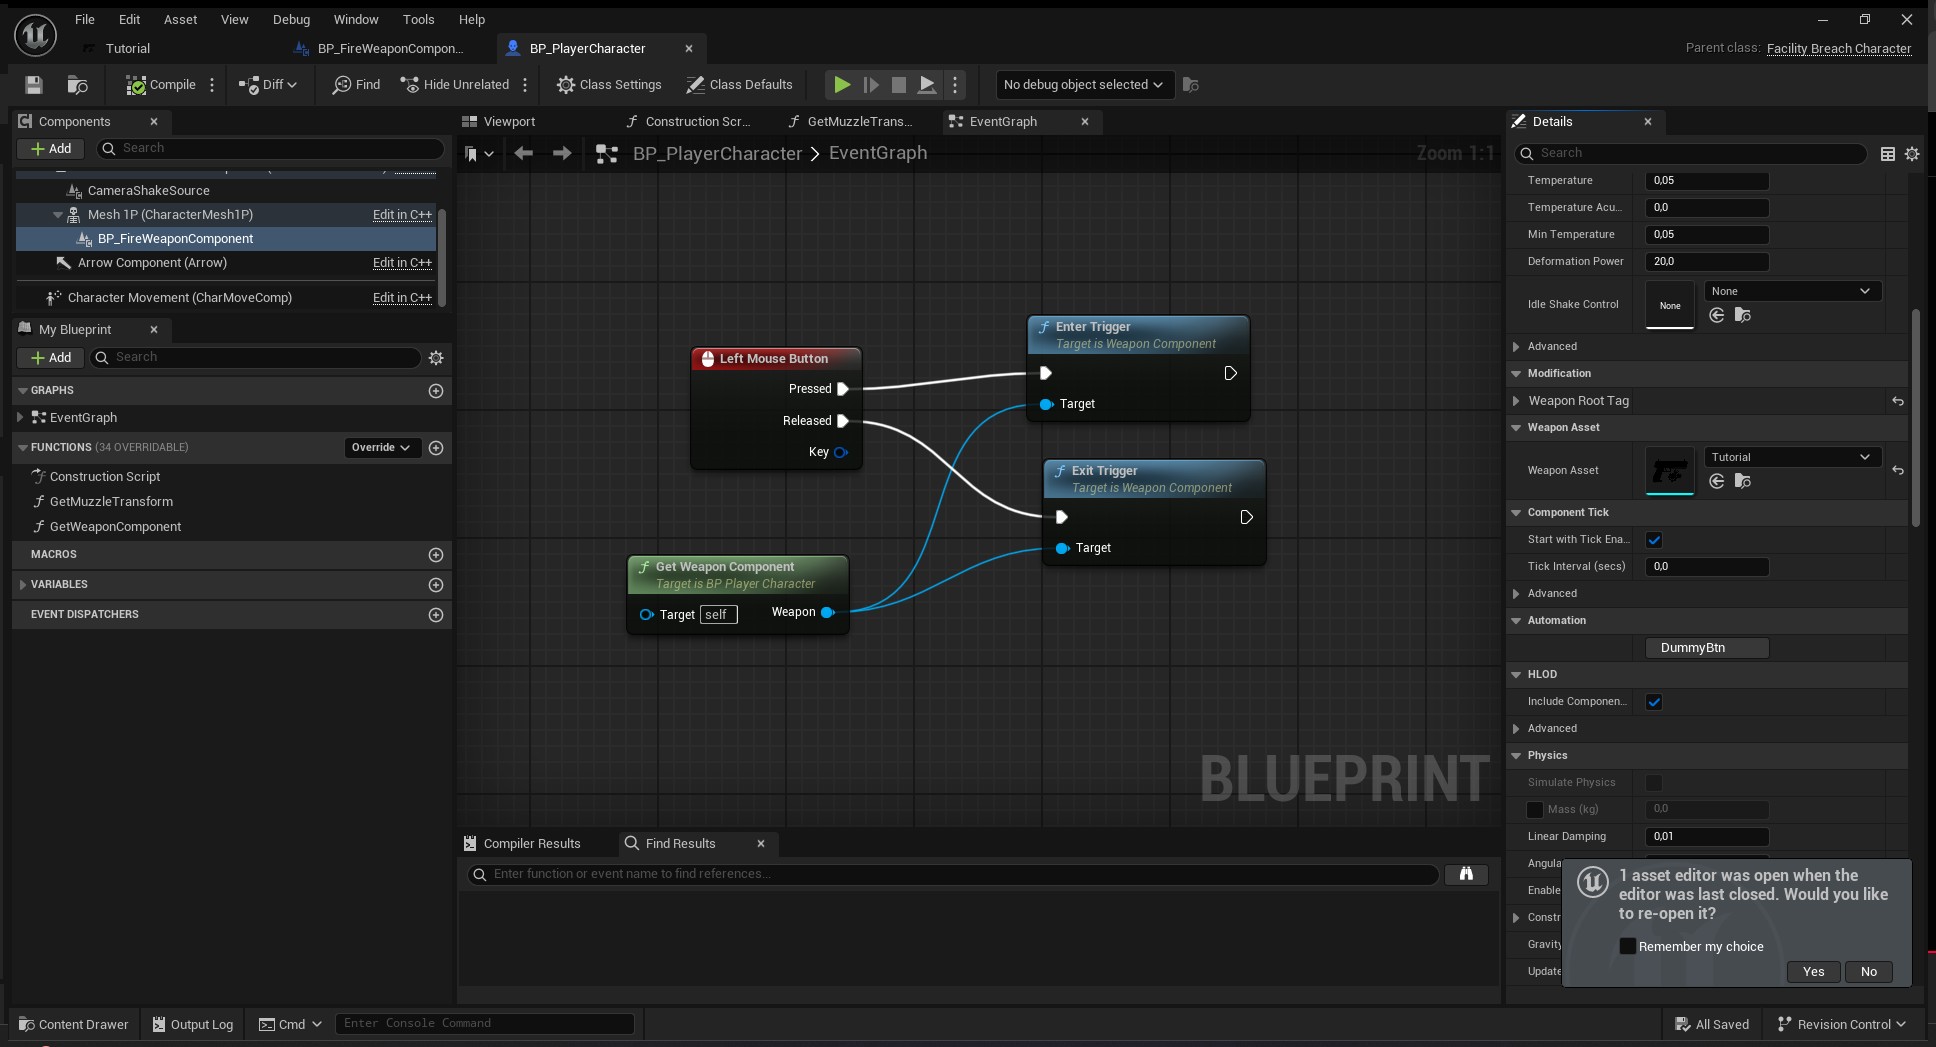
Now we'll set up the input so the left mouse button controls the trigger.
- In the Character's Event Graph, add an InputAction or InputKey node for Left Mouse Button.
- From the Pressed output, drag off and call EnterTrigger on the Weapon Component.
- From the Released output, drag off and call ExitTrigger.
If you are using Enhanced Input, create an
Input Action asset and bind it in your Input
Mapping Context. The exact method depends on your project
setup; the key point is that
EnterTrigger and
ExitTrigger are called correctly.
Test the Weapon (First Run)
Now that the Weapon Component is attached and the input is wired, launch the game. You should see the weapon appear attached to your character and respond to the left mouse button.
Verify visual assembly
- Start the game.
- Confirm the weapon and all its attachments are visible.
- Check that no components are floating at the world origin.
Verify the trigger
Press and hold the left mouse button. You should see a continuous stream of "Shooting works!!!" messages. Release the button and the messages stop.
- Is the correct Weapon Asset assigned to the component?
-
Is
Fire Rategreater than 0? - Did you set the Weapon Root Gameplay Tag correctly?
-
Are
GetUsesAmmo()andGetUsesMagazine()returningfalse? - Is the Weapon Component added to the Character?
-
Are the input nodes calling
EnterTriggerandExitTrigger?
The core loop is working. Now we'll make it richer by adding data assets and an in-game modification UI.
Create Data Assets for Descriptions
The plugin can automatically generate a user‑friendly
description of the weapon, its slots and modifications using
the DevComment fields you filled in the Gameplay
Tags. To expose this data to UI, we need to wrap it in Primary
Data Assets.
We'll create two assets:
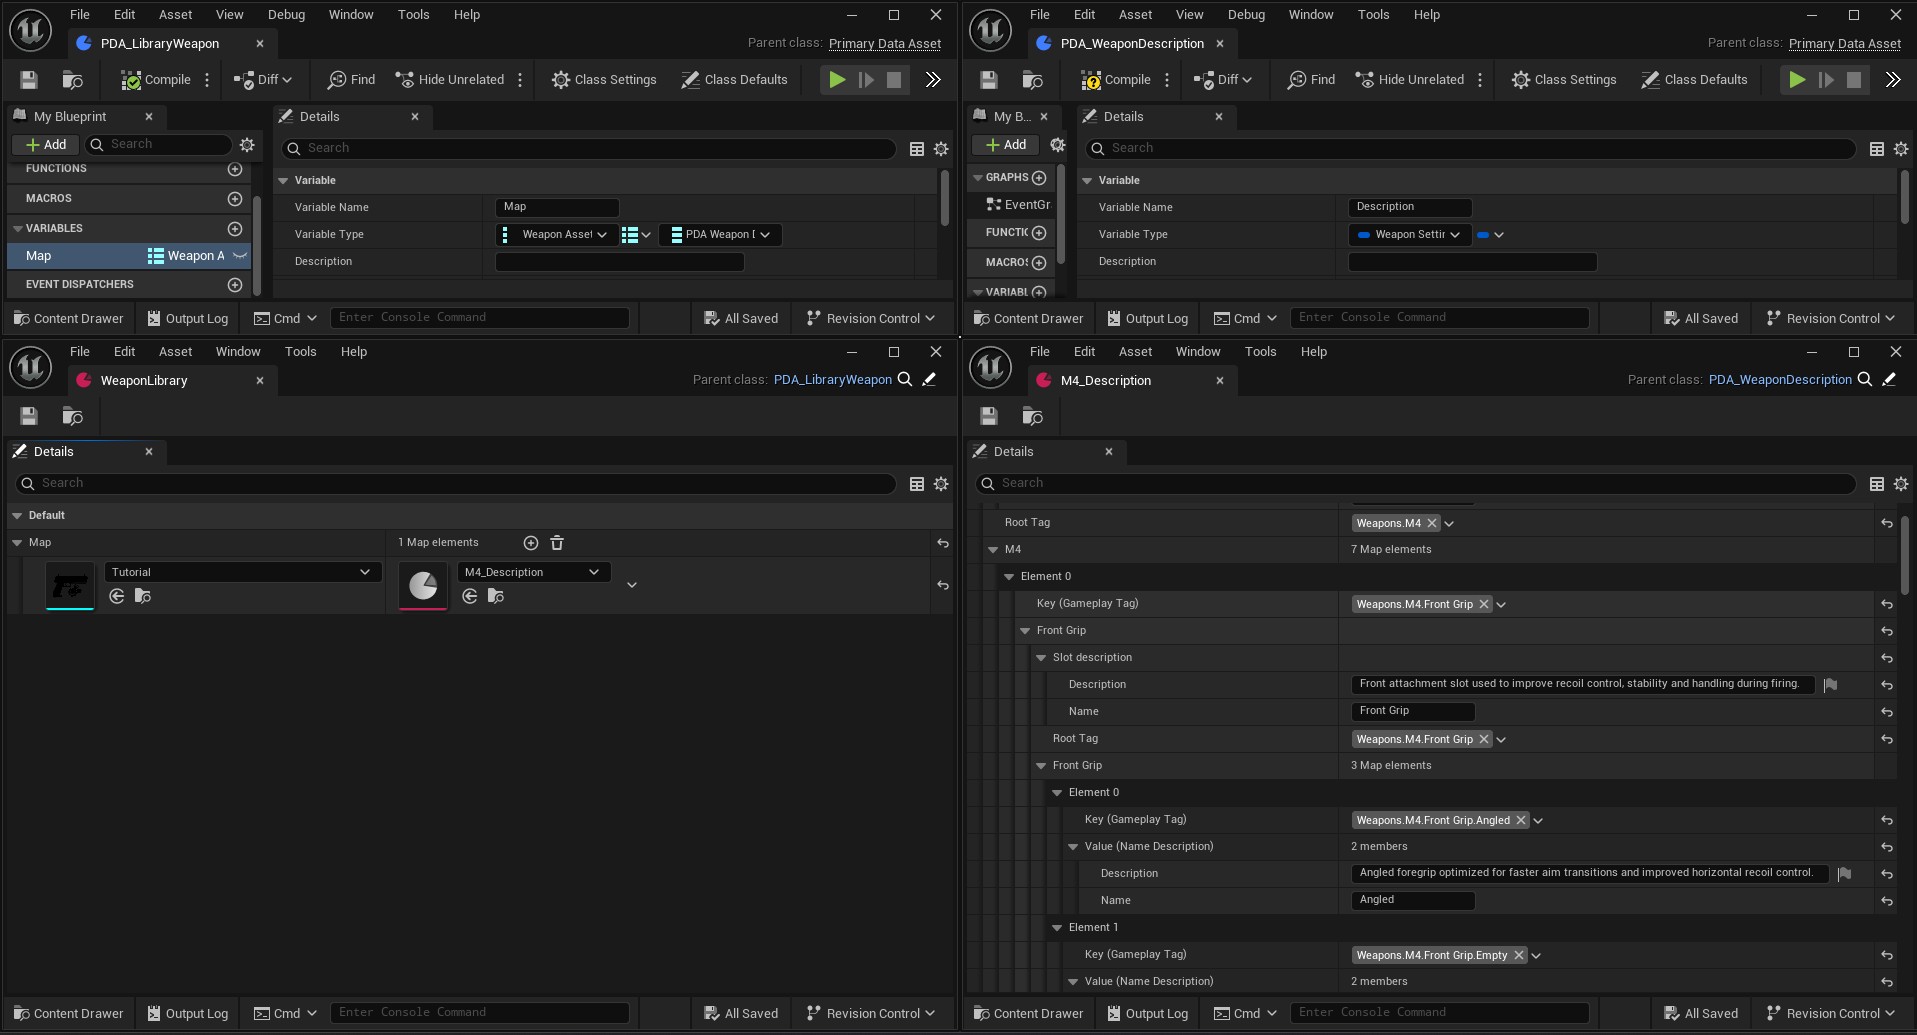
- PDA_WeaponDescription – stores the description of a single weapon.
- PDA_WeaponLibrary – a map that links Weapon Assets to their descriptions.
PDA_WeaponDescription
-
Create a new Blueprint class derived from
PrimaryDataAsset. -
Add a new variable of type
Weapon Settings Description Simple
(this is a struct provided by WAS). Name it
Description. - Save and compile. Name the Blueprint BP_WeaponDescription.
- Create a Data Asset instance from it (right‑click → Miscellaneous → Data Asset).
-
Open the Data Asset and set Root Tag to the
same weapon root (e.g.,
Weapon). -
The struct auto‑populates with all slots and
modifications. If you filled the
DevCommentfields, the descriptions appear automatically.
PDA_WeaponLibrary
-
Create another
PrimaryDataAssetBlueprint, name it BP_WeaponLibrary. -
Add a variable of type Map:
-
Key:
Weapon Asset(soft reference) -
Value:
BP_WeaponDescription(soft reference)
-
Key:
- Compile and create a Data Asset instance.
-
Add an entry: set the key to your
WA_M4and the value to thePDA_WeaponDescriptioninstance you just created.
Display and Modify Weapon In‑Game
Now we'll bring up a UI that lets you swap modifications at runtime and see the weapon rebuild instantly.
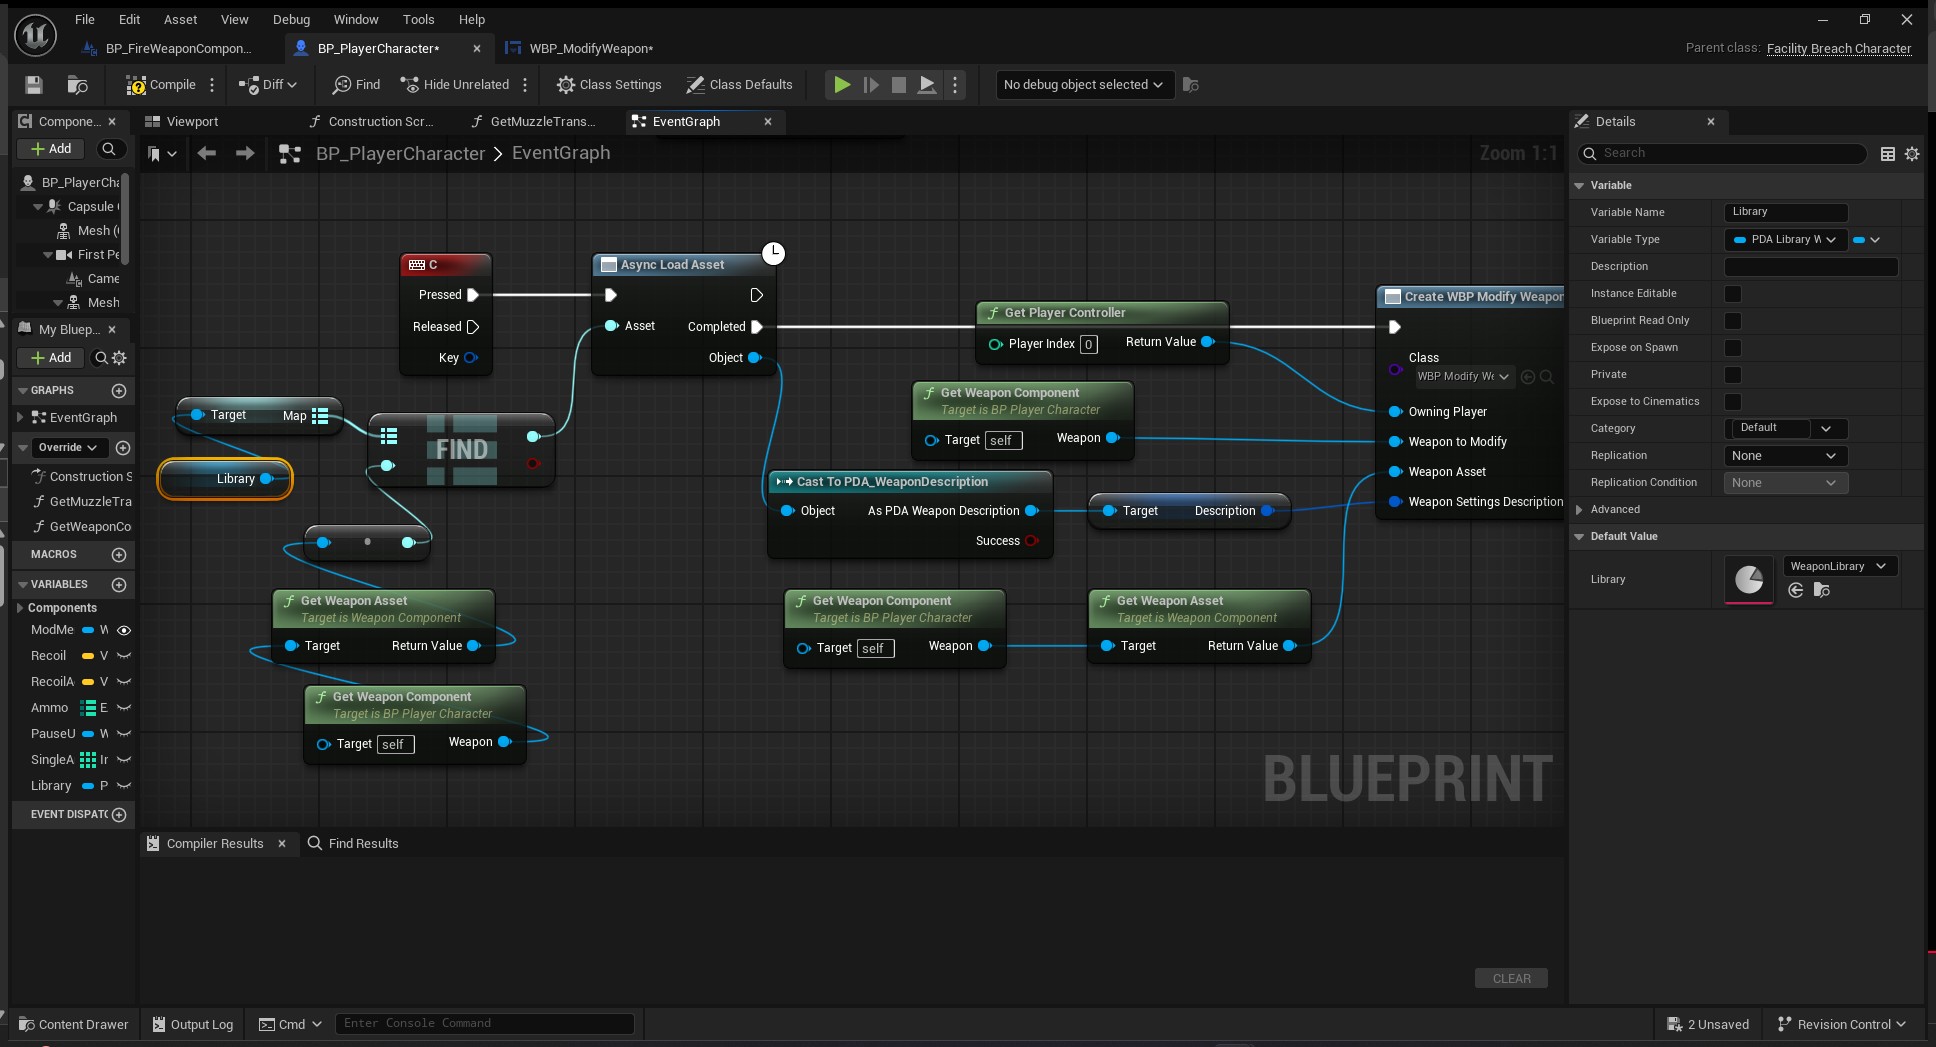
Step 1: Open the modification menu
- In your Character Blueprint, add an input event (e.g., C key).
-
Add a variable
Libraryof typeBP_WeaponLibraryand assign the Data Asset you just created. -
From the input event, get the
WeaponComponent→ callGet Weapon Asset. -
Use the
Libraryvariable → get the Map property → Find using the Weapon Asset as key. -
Load the soft reference to obtain the
PDA_WeaponDescription(you may need a cast). - Get the
Descriptionstruct from it.
Step 2: Create the built‑in modification widget
WAS ships with a ready‑to‑use widget called
WBP_ModifyWeapon.
-
Call Create Widget and select
WBP_ModifyWeaponas the class. -
Connect the following input pins:
-
WeaponToModify– your Weapon Component -
WeaponAsset– the Weapon Asset from the component -
WeaponSettingsDescriptionSimple– the struct from the Data Asset
-
- Bind the OnApplyMods event to a custom event that removes the widget (or closes it).
- Add the widget to the viewport, show the mouse cursor and switch input mode to UI only.
The default widget lists every slot, every modification (with their descriptions) and includes Apply/Revert buttons. When you press Apply, the weapon rebuilds automatically.
Add More Variability
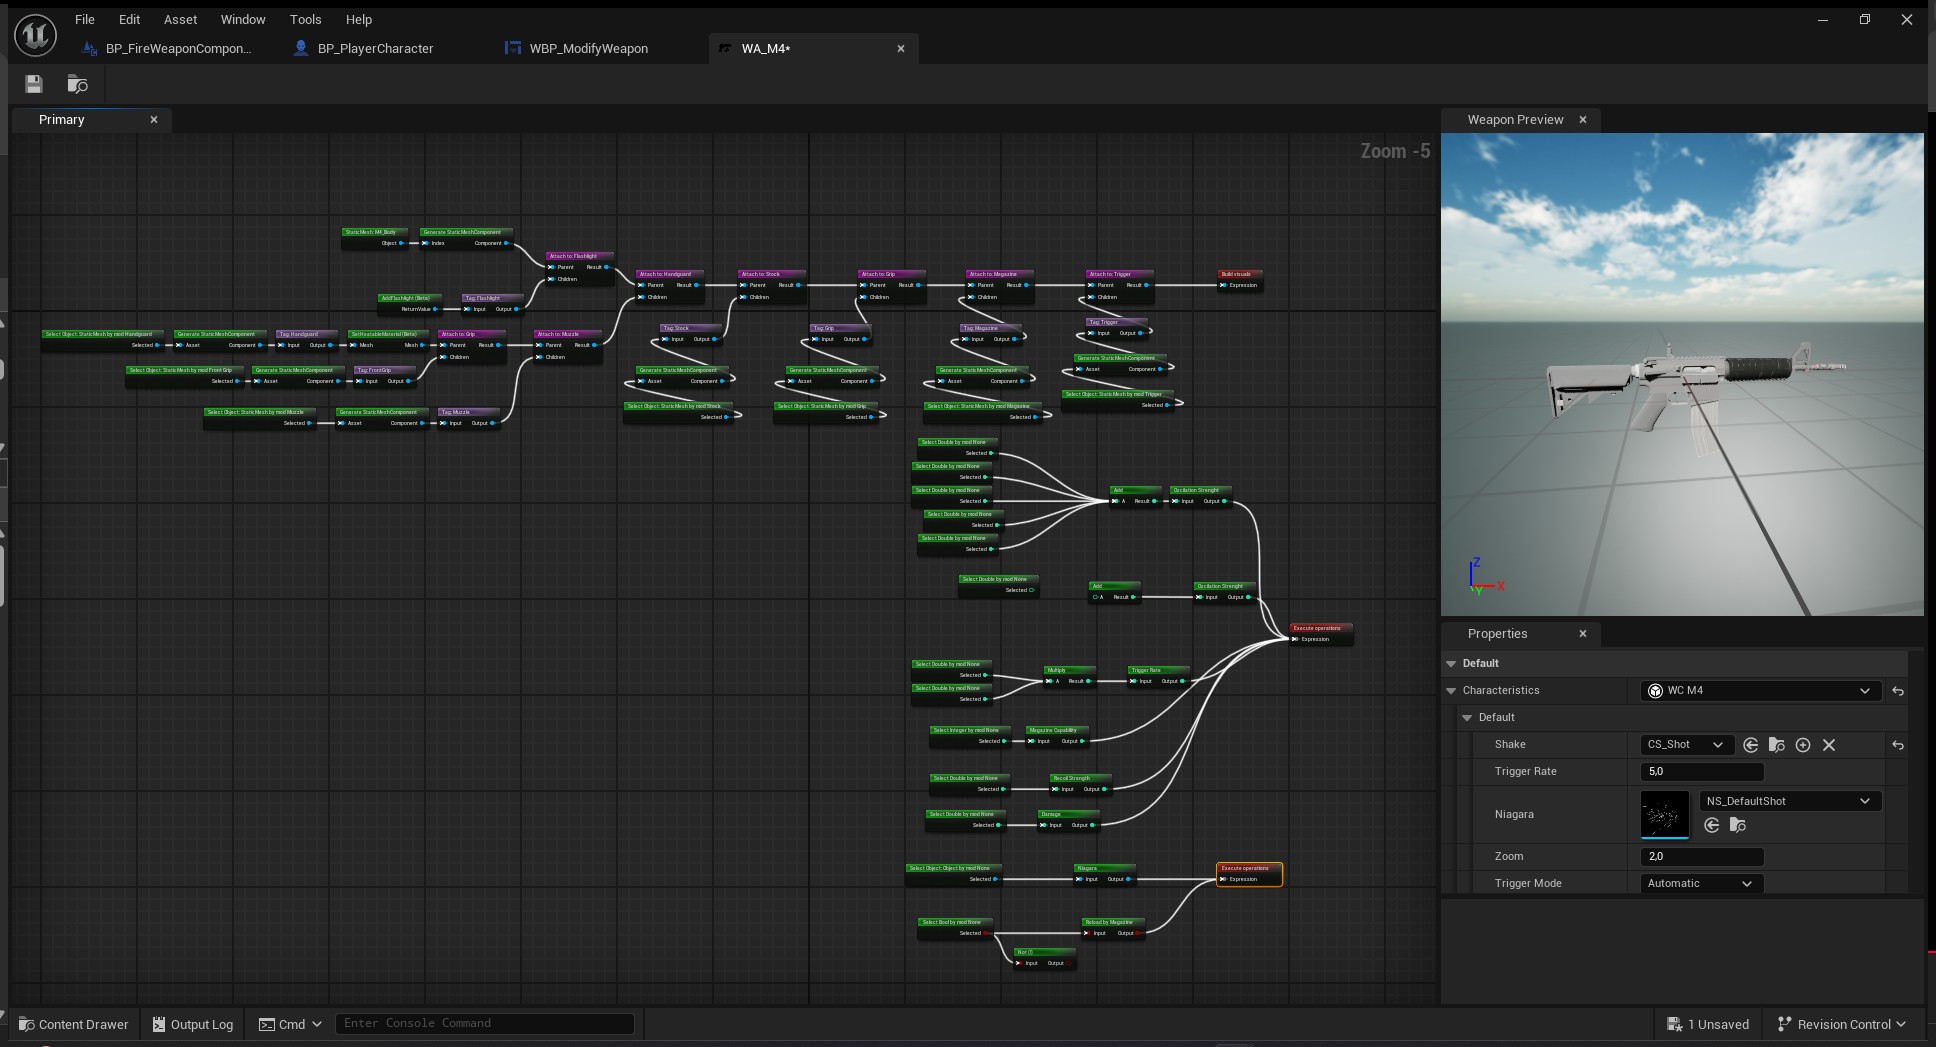
Now that the whole pipeline works, you can enrich your weapon by adding more slots, more modifications, more properties and more graph nodes.
- Duplicate your Weapon Asset and try different fire‑rate curves per modification.
-
Add a new slot (e.g.,
Muzzle) and hook it to different muzzle flash Niagara systems. -
Override additional characteristics variables (recoil,
spread, etc.) and expose them in the
Execute Operationsgraph.
The system scales gracefully – every new Gameplay Tag is automatically recognised by the Weapon Asset editor and the modification UI.
If you modify your gameplay tags, by adding a new slot or a new modifier make sure the modifications are reflected at the description data asset. Once you open the data asset should automatically update to your new architecture, but you still need to at least open it once
Test Again
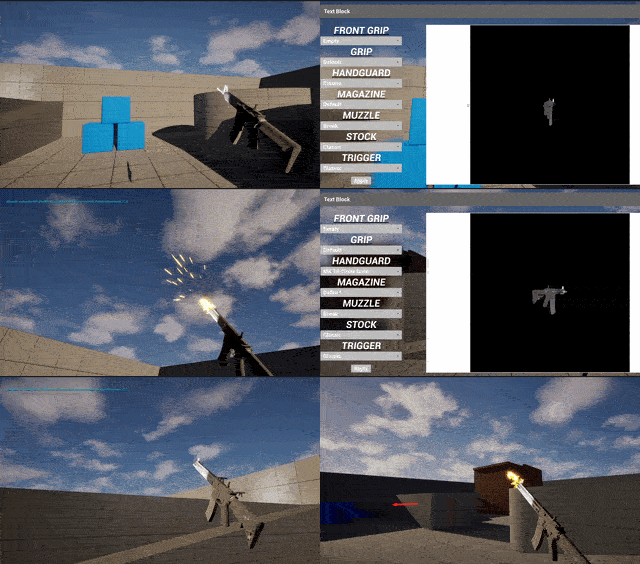
Launch the game once more. Press the key you assigned to open the modification menu, swap a few attachments and observe how both the visual mesh and the fire rate change immediately.
If you added different meshes for each modification, you should also see the weapon geometry update seamlessly.
From here, the possibilities are endless. Every weapon in your game can follow the same pattern, and designers can tweak values without touching a single line of code.
Create your own nodes with blueprints
Pending documentation...
Extending nodes in C++
Pending documentation...
Create your game Widget for modifiers
Pending documentation...
Use your own weapon logic
Pending documentation...